Building from Source
Learn how to compile the Evo source code into a binary executable
Prerequisites
Supported Platforms
The following configurations are "officially supported" (and tested):
- OS: Recent versions of Windows, GNU/Linux, or Mac OS
- Toolchain: GNU Compiler Collection
g++on Linux is easily installed with your distribution's package managerg++is actually Appleclangon Mac OS, but it's largely compatibleg++on Windows must be provided via MINGW64 (using MSYS2 - standalone won't work!)
- When using the Windows Subsystem for Linux, simply follow the instructions for Linux builds
Other operating systems and toolchains might be compatible as well, but no promises there.
Development Environment
A number of tools and libraries need to be installed (and made available in your PATH) before you can build the runtime.
Windows
The following steps are necessary before you can start the build process:
- Download and set up a Linux-like MSYS2 environment
- Use the provided
mingw64.exeshell, e.g., via start menu:MSYS2 MINGW64(requirement for compiling OpenSSL) - Install build tools:
pacman -S git make mingw-w64-x86_64-gcc ninja mingw-w64-x86_64-cmake mingw-w64-x86_64-rust --noconfirm
The above command, when run in a MSYS2 shell, should install all required tools on Windows.
The default gcc, g++, cargo, and cmake cannot be used in MSYS2.
Instead, you must install the x86_64 variant listed above.
Make sure you have access to the typical Unix tools as well as ninja, cmake, cargo, gcc, and g++ in your terminal before proceeding.
Mac OS
A complete setup procedure involves the following steps:
- Download the Homebrew package manager
- Install Apple's compiler toolchain:
xcode-select --install - Install the required build tools:
brew install git cmake ninja coreutils rust
You should be able to execute gcc, g++, cmake, cargo, and ninja in your terminal before starting the build.
Linux
On Ubuntu (and other Debian-derived distributions), this should install all the necessary build tools and development dependencies:
sudo apt update
sudo apt install make cmake ninja-build cargo binutils build-essential libgtk-3-dev libwebkit2gtk-4.0-dev libpulse-dev --yes
The above command works on a fresh Ubuntu system and includes the GNU compiler toolchain as well as some required development headers.
For ArchLinux, some package names will be slightly different from both Windows and Ubuntu:
pacman -Syu base-devel cmake ninja rust webkit2gtk gtk3 pulseaudio
Development headers don't need to be installed separately here since they're included in the above packages.
Standard Build Workflow
In case of problems: You can always take a look at the build workflows to see all required steps (and the expected results).
Recursive Checkout
Make sure to recursively check out the source code to include the required submodules:
git clone https://github.com/evo-lua/evo-runtime --recursive
Afterwards, you should find various third-party dependencies (organized as Git submodules) in the deps folder.
Building Dependencies
Before trying to compile the runtime, you must build all of its dependencies at least once. This process can take a while, but you won't have to repeat it unless the dependencies (Git submodules located in deps) have been updated.
Once you have all of the required tools installed, simply run the provided shell scripts from the project root:
- On Windows, run
deps/windowsbuild-all.shin a MSYS2 MINGW64 shell (not the regular CMD or PowerShell) - For Unix-like systems, run
deps/unixbuild-all.shinstead in any bash-like shell (including the Mac OS X Terminal)
If all went well, you should find several static libraries (*.a) in the ninjabuild-unix (or ninjabuild-windows) folder:
While the all-in-one build scripts are convenient, you can build each dependency individually. Several build scripts following the convention of library-platform.sh (e.g., luajit-unixbuild.sh) live inside the deps folder, alongside other utility scripts.
It's recommended to only rebuild the dependencies when needed, as some of them can take a long time to compile (e.g., OpenSSL).
Building the Runtime
Once you have all the dependencies prebuilt, you can compile the runtime itself:
- Windows: Run
windowsbuild.cmd(using the MSYS2 shell is optional here) - Otherwise, run
unixbuild.sh(using anybash-compatible shell)
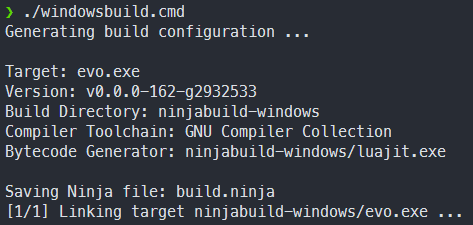
Running the script will generate a build.ninja file with the build description (sans dependencies):

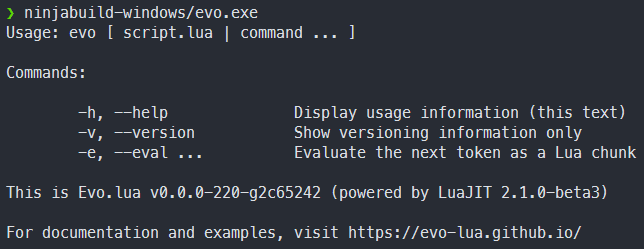
Ninja will compile and link the evo executable (without rebuilding any dependencies), which you can then run:

Since this process is fast, you can iterate quickly after making changes and rebuild dependencies only as needed.
Running Tests
You may want to run the unit test suite to exercise the freshly-built executable:
ninjabuild-windows/evo.exe Tests/unit-test.luaon Windowsninjabuild-unix/evo Tests/unit-test.luaon other systems
Some more basic smoke tests can similarly be run via:
ninjabuild-windows/evo.exe Tests/smoke-test.luaon Windowsninjabuild-unix/evo Tests/smoke-test.luaon other systems
Additionally, there are a number of integration tests that will open some native WebView windows (amongst other things):
ninjabuild-windows/evo.exe Tests/integration-test.luaon Windowsninjabuild-unix/evo Tests/integration-test.luaon other systems
You can also move the executable to somewhere in your PATH, and then omit the ninjabuild-* prefix.
Troubleshooting
Windows: Silent Build Failures
If you're seeing silent failures (nonzero exit code, but no visible output) or cryptic make errors: Chances are you're using the wrong compiler toolchain. Double-check that mingw-w64-x86_64-gcc is being used and not the default gcc, Be aware that both executables may potentially have the same name. Luckily, you can query the package manager to find out where the right version is located:
$ which gcc
/mingw64/bin/gcc

$ pacman -Ql mingw-w64-x86_64-gcc | grep gcc.exe

mingw-w64-x86_64-gcc /mingw64/bin/gcc.exe
mingw-w64-x86_64-gcc /mingw64/bin/x86_64-w64-mingw32-gcc.exe

$ pacman -Ql gcc | grep gcc.exe

gcc /usr/bin/gcc.exe
gcc /usr/bin/x86_64-pc-msys-gcc.exe
Since packages like llvm (for clang-format) depend on gcc, you may end up with both versions on your system by accident.
Windows Subsystem for Linux
If you just installed WSL and set things up, CMake may fail with an error:
CMake Error at /usr/share/cmake-3.22/Modules/CMakeTestCCompiler.cmake:85 (configure_file):
Operation not permitted
Solution: Restart WSL
Mac OS X Deployment Target
You must set the special environment variable MACOSX_DEPLOYMENT_TARGET to a compatible value for the build to succeed. Example:
MACOSX_DEPLOYMENT_TARGET=12.6 deps/unixbuild-all.sh && ./unixbuild.sh
See Apple's (outdated) documentation for details, or the build workflow for Mac OS that contains the version used to create releases.
Alternatives
GitHub Releases
You can try the prebuilt releases available on GitHub. They should work on all modern x64-based Windows and Mac OS systems.
With Linux, results may vary due to a variety of compatibility issues. Luckily, building is easy here and should generally be no problem. Releases for other platforms or architectures may be added by popular demand, if and only if the maintenance burden is worth it.